
START HERE / 8 CHAPTERS
Your first task. A clear path forward.
Begin in your browser. Connect a computer when a task needs local files or creative software, and learn to check where the result really lives.
Adapted from the official beginner guide and reviewed against current client availability. Screenshots show the original public demo from 21 October 2026; the current interface may differ. Original guide ↗
Understand the system: start in your browser
Learn what the workspace, desktop client and editor connections do, then choose a starting point.
CoArtDex connects natural-language tasks to cloud projects, your computer and supported creative software. Start with a small task in your browser. Connect a computer when you need its files or applications. The web workspace is available on desktop, phone and tablet browsers.
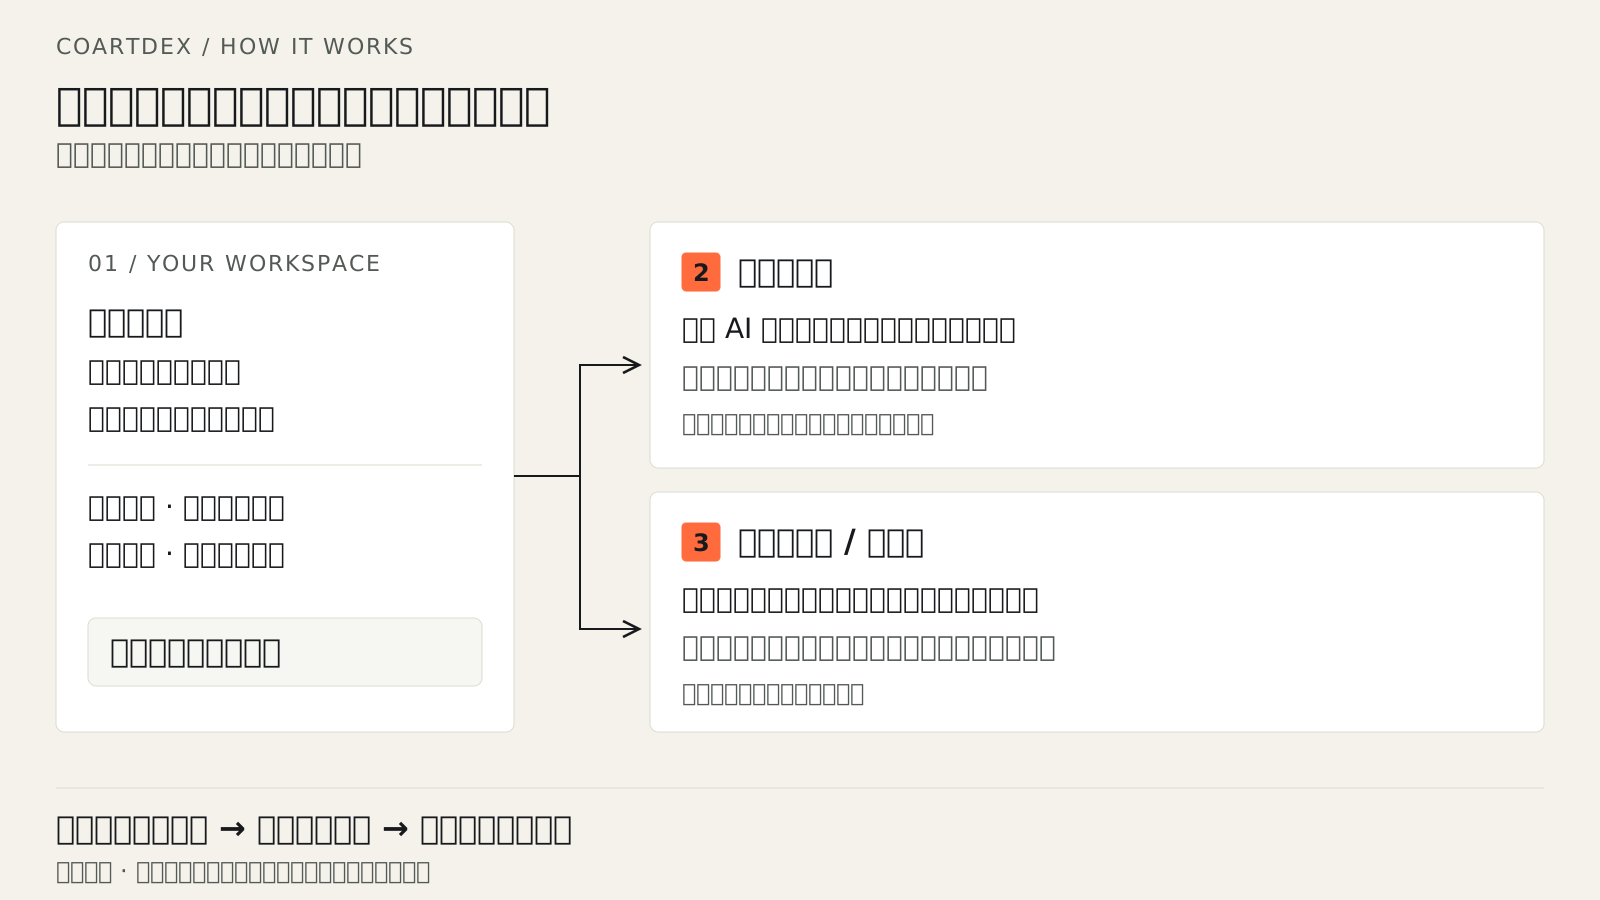
| Entry point | What you do here |
|---|---|
| Website | Read tutorials, download clients and review subscriptions and account benefits. |
| Web workspace | Choose a project and work location, describe tasks, follow progress and inspect results. |
| Cloud service | Handle conversations, coordinate available tools and store cloud project materials. |
| Desktop client | Connect your account to a particular computer and perform permitted local operations. |
| Editor connection | Access a particular running application and project, with its own connection and permissions. |
| Local models | Use the selected computer for supported image or video generation and image upscaling. |
- On your phone or tablet, open the web workspace and sign in to the same account. Open the project and conversation you want to continue.
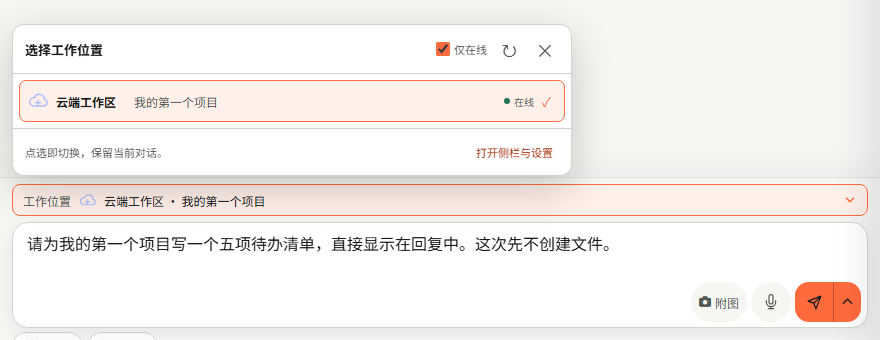
- Before sending, check Work location above the input box. Choose the cloud for a cloud task, or the online computer or specific editor project for remote work.
- Read the response and answer any necessary follow-up questions. On smaller screens, use buttons such as Project files to reveal collapsed panels.
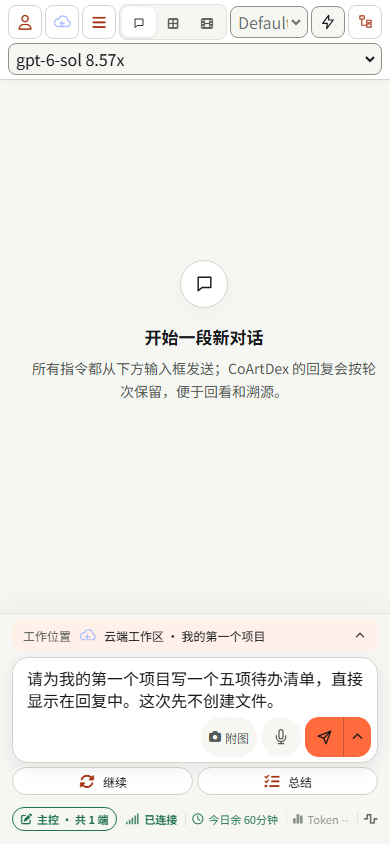
- A project organizes conversations and materials for a piece of work. A conversation contains the discussion of a task. A directory is the actual folder holding files.
- The target is the cloud workspace, computer or editor selected for this turn. Chat models interpret tasks; local generation models are a separate capability.
- Success check: you can explain where the task runs, where its output goes and which device must stay connected.
Sign in and open your first project
Use one CoArtDex account and complete a cloud exercise you can check immediately.
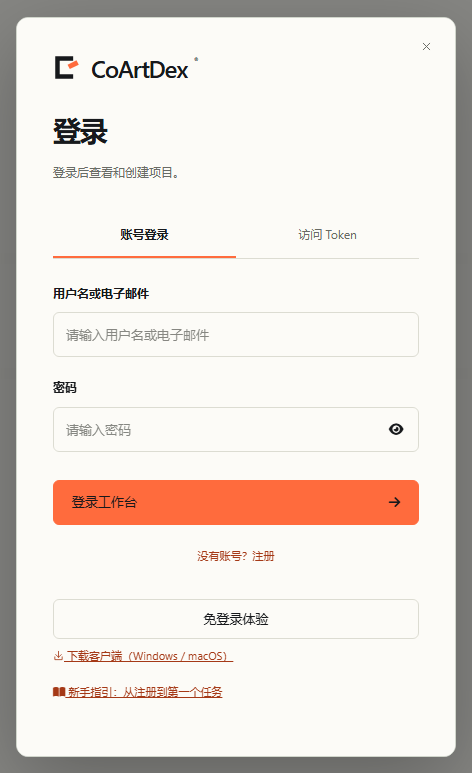
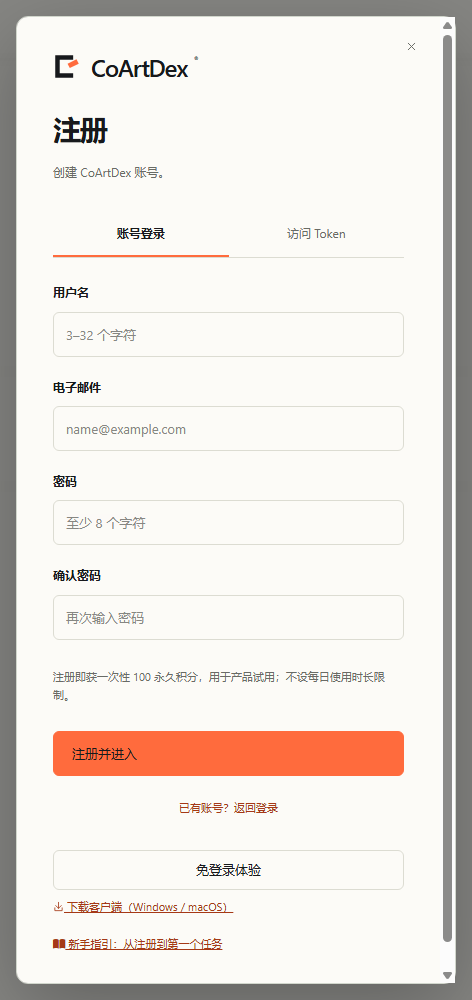
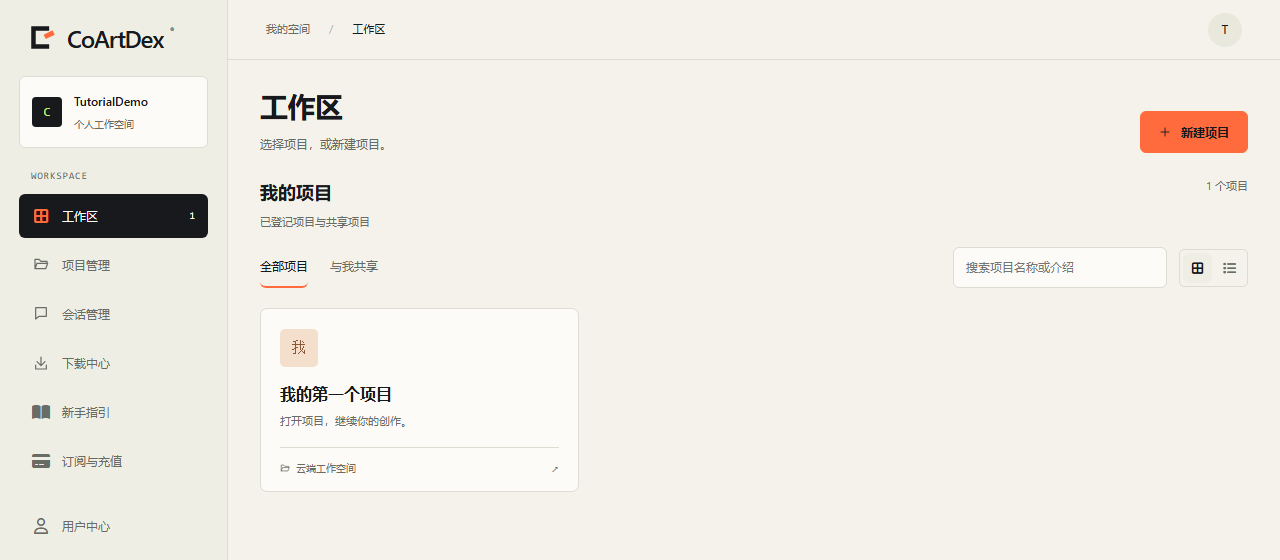
- Use Open workspace on this site to enter artdream.net/codex/. If signed out, open the user menu and choose account sign-in.
- Sign in with your existing account, or register with a username, email address and matching password entries.
- Open an existing project, or create a clearly named practice project such as My first project.
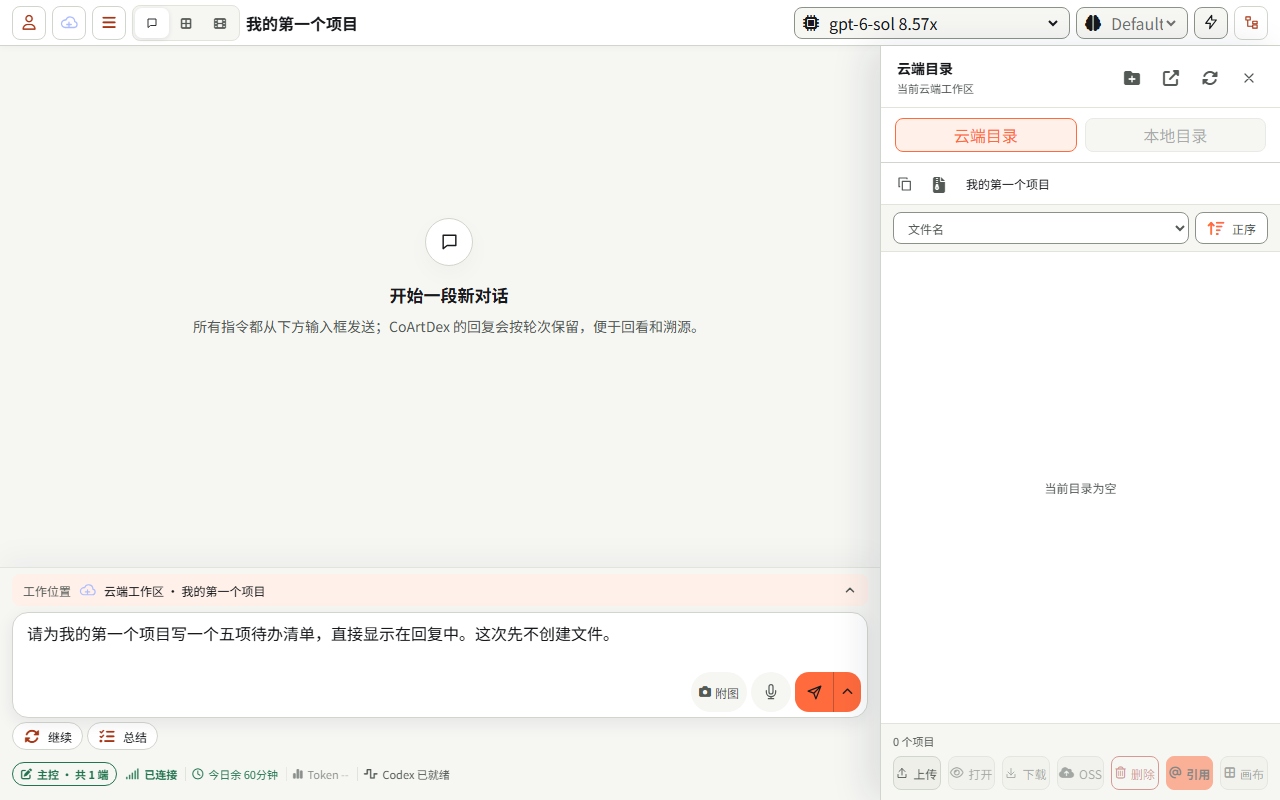
- Check that the project name and conversation area appear, then select Cloud workspace as the work location.
Your first cloud exercise
Write a five-item to-do list for My first project and show it directly in your reply. Do not create any files for this step.
After receiving the list, ask to revise one item. Practice sending, reading and refining a request. Success means the response appears in the intended project conversation and you can continue it. Model availability depends on your current account benefits and balance.
Choose a client and connect your computer
Choose a package for your operating system, chip and workflow, then verify the device in the workspace.
You can keep using the browser for cloud-only tasks. For computer files or programs, first visit this site's download page to check the current version, system requirements, release channel and installation instructions. Full clients, portable packages and minimal clients may have different interfaces and capabilities; follow the instructions for your package.
| Choose | Check first |
|---|---|
| Windows full / portable | Check the system, architecture, installation method and release status. The full-client steps below use its first-connection screen. |
| Windows LegacyBridge minimal | A separate preview channel for older systems, with device, file and command connectivity. Full-client instructions for the embedded workspace, editor plugins and local-model panel do not apply. |
| macOS full | Choose by chip and available release channel. Check the download page for signing, notarization and system requirements. |
| macOS minimal | Preview packages are available for both Apple Silicon and Intel. Download the matching architecture and follow that package's connection instructions. |
| Android client | This is a separate mobile preview package. It is not required to access the workspace in a phone browser. Check the actual Android client for permissions and available actions. |
- Full client: install and open it, then enter the first-connection setup. Use the service address in the official connection instructions; the current endpoint is https://artdream.net/codex .
- Choose the registered-account option using username/email and password. Enter the same account as the website, set a recognizable device name and select Register and connect. Here, registration binds the device.
- Wait for the client to show Online. Refresh Work location in the browser, select the matching computer and check the work-mode and directory controls.
Windows LegacyBridge: extract the complete ZIP, keeping its executable and configuration together. Open the graphical app, enter the service address, device name and account, then enable file and command access as prompted and connect. Keep the window running and select the computer in your browser. For macOS minimal, use that package's launch and authorization flow rather than Windows executable names or permission steps.
| Situation | Next step |
|---|---|
| Online but absent from the browser | Check the account and service address, refresh the list and review the online-only filter. |
| Computer listed but task runs in the cloud | Select the computer and verify the current target before sending a local task. |
| No device slots available | Check benefits and bound devices in your account. Downloading the app does not grant a device slot. |
| Sign-in fails | Check the sign-in method, account and service address. Keep the error text for diagnosis. |
Choose where to work and where output goes
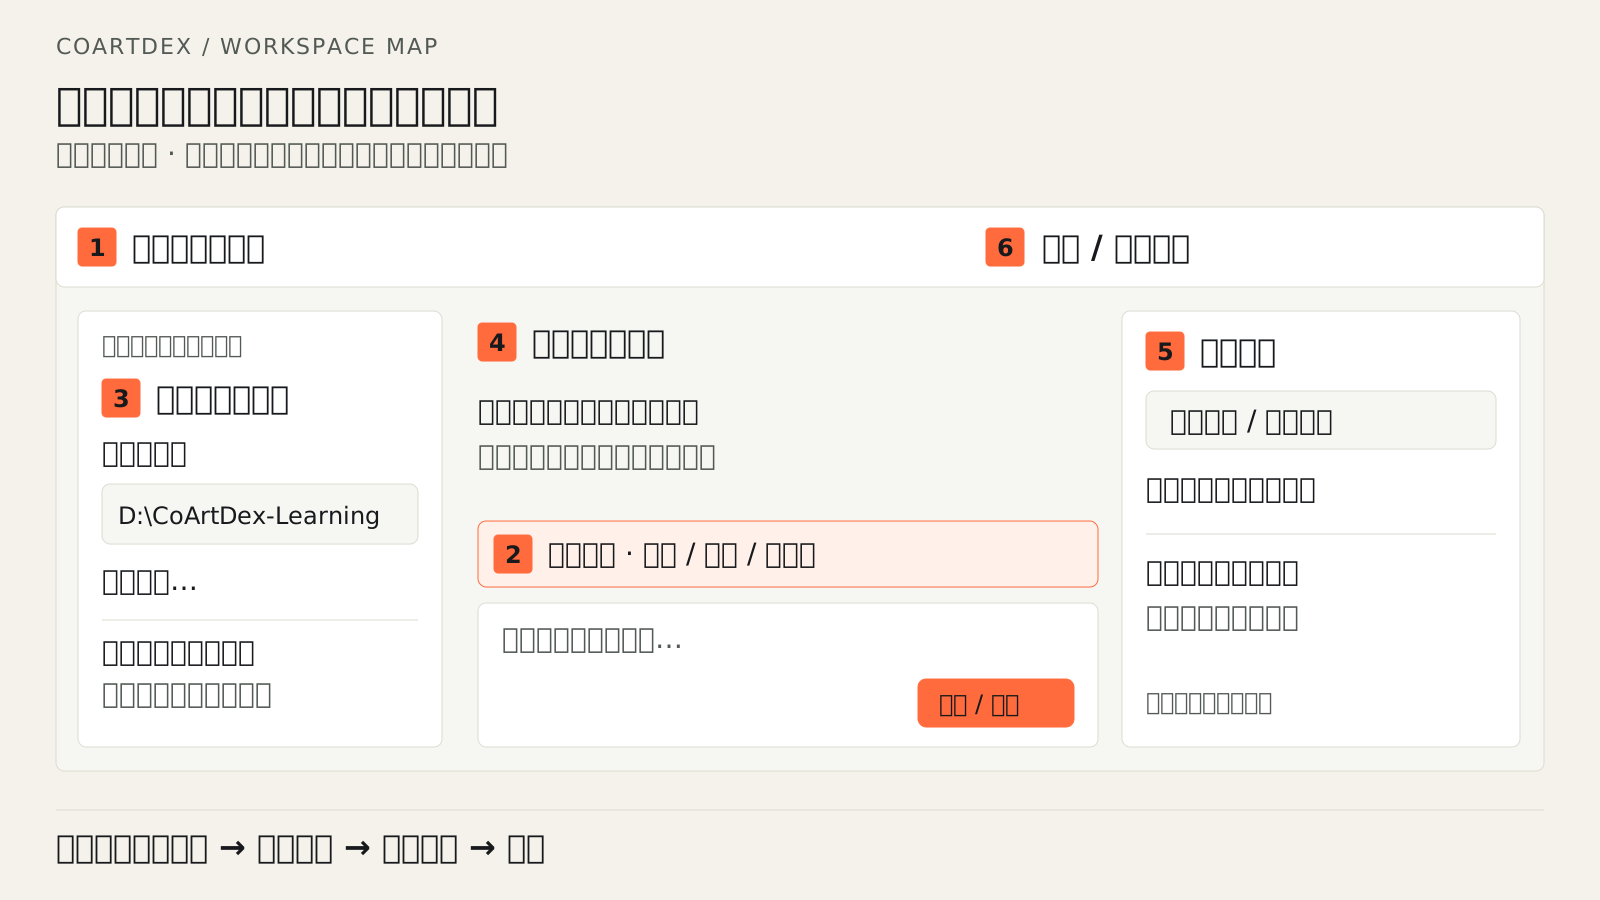
Check the target, work mode and file-browser source separately so output goes where you intend.
| Your task | Location / mode | Default output |
|---|---|---|
| Work with cloud materials | Cloud workspace | Current cloud project |
| Edit computer files or run programs | Computer + Produce locally | Selected directory on that computer |
| Read local materials and deliver cloud output | Computer + Provide materials for the cloud | Current cloud project |
| Modify an open editor project | Matching editor project card | Selected project; verify export paths in tool results |
- Prepare a practice folder on the target computer, such as D:\CoArtDex-Learning on Windows or a subfolder in your Documents directory. On a Mac, use its actual directory path.
- Select the computer in Work location, open the sidebar settings and choose Produce locally.
- Use Choose directory to browse or enter the full path, then select it. Verify that the interface shows the intended computer and actual path.
- State the task, constraints and output location in your request. An explicit location takes precedence over the default.
A directory is a default work location, not a boundary on computer permissions. One project can use different paths on different computers. For editor tasks, select the matching project card; choosing a folder does not replace that step. Success means you can identify the target computer or project and the intended output location before sending.
Create and verify your first local file
Inspect first, create a checklist, then read it back and open the actual result.
Select the computer, Produce locally and your practice directory first. The prompts below use the current directory; they do not select the task target for you. This exercise produces one small text file. Confirm the path before creating it.
1. Verify the computer and directory
Perform a read-only check of the selected computer and working directory. Report the computer name, actual absolute path and files in that directory. Do not modify anything yet.
Check the reported computer and path. If it points to the cloud, another computer or the wrong folder, correct the work location first. Success means the directory the assistant inspected matches the one you selected.
2. Create a new file
Create a UTF-8 file named learning-checklist.txt in the current local practice directory. Put these items on separate lines: Confirm project, Confirm computer, Confirm directory, Perform task, Check result. If the filename already exists, use a new name and preserve the existing file. Read the result back to verify its content and report its full local path.
- Wait for the report of the actual file and its read-back result. Answer any follow-up questions. Submitted or Processing are still intermediate states.
- Refresh the local file list in the workspace and open the file. Then open the same path in your computer's file manager and check the text and five items.
- Verify that both views show the same result. A checklist in a chat reply is not sufficient evidence that the file exists.
3. Save a practice revision
Read the checklist you just created, add a final line saying Keep backups of important files to a copy, and save it as a new learning-checklist-v2.txt. If that name is also taken, choose another new name. Preserve the original checklist, read back the revised file and report its full path.
A reusable task template
In [computer or project], use [directory or file] to complete [goal]. Follow [constraints], save the result to [specific location] and verify it by [reading the file, inspecting the view or running a check]. Explain the specific impact before overwriting existing work.
Connect creative software and select its project
Computer online, editor connected and project selected are three separate states to verify.
Open a practice project in the application and save a copy before connecting the editor. Computer online means the client is available. Editor connected means the plugin can access the running instance. Selecting the project identifies which content this turn should use.
- In a client that supports it, open Editor connections and inspect the environment and plugin status. You can also request an inspection in a conversation targeting that computer.
- Verify the actual application version and target project. If installation or repair requires closing the editor, save your work, close it as prompted, finish setup and reopen the project.
- Enable the connection component and required permissions in the application. Refresh the workspace location list and select the correct editor project card.
- Start with a read-only inspection. Compare object names, project names and the visible scene before making a small change.
Inspect a Blender connection
Inspect the Blender versions and connection-plugin status on the selected computer, and report the detected target. If installation or repair is needed, identify the specific target. If Blender must close, wait for me to save. After setup, verify the actual connection.
Inspect the project before editing
Read the currently selected Blender project, list its scene objects and current selection, and capture the viewport. Do not edit the model yet.
Make one small practice edit
Add a cube named Learning_Cube beside the origin in the current practice scene. If that name already exists, choose a new name. Show the actual viewport afterward, without overwriting the saved project.
| Application | What to verify |
|---|---|
| Blender | Actual scene, enabled plugin and modeling or scripting permissions. |
| Unity | The intended project containing Assets and ProjectSettings, and the connection after components import. |
| Unreal Engine | Target .uproject, compatible engine and plugin versions, and the open project. |
| AutoCAD / SketchUp | Compatible connection component and the actual open drawing or model instance. |
| DaVinci Resolve | Supported version, external scripting settings and target project; follow its connection guide. |
| Rhino | Surface-based 3D modeling. Check the target model, units, objects and operations available through the current workspace connection. |
| CorelDRAW | Vector graphics and text design. Check the active document, selected objects and text layout, then confirm the current workspace capabilities. |
| PhotoCraft / VectorCraft / LightCraft | Image editing, vector illustration, and photo-library and RAW workflows respectively. Check the source materials and intended result; use the entry point and capabilities available in the current workspace. |
| FilmCraft / EffectCraft | Video editing, and motion graphics and visual effects respectively. Confirm the media, timing and output requirements, then check the current workspace capabilities. |
| PrintCraft / DesignCraft | A PDF workspace, and page layout and publishing respectively. Confirm the document, page dimensions and output format; follow the entry point and capabilities available in the current workspace. |
| Other creative software | Use the capabilities reported for the platform and active connection. |
Check the environment, then try local generation
Verify real operation with a small sample before using local generation for production work.
The workspace chat model interprets and organizes tasks. Supported client-side models generate images or videos, or upscale images. They have different entry points and environment requirements; installing an image model does not replace the chat model.
- Open Local models in a supported client, or choose a local image, video or upscaling task from the workspace task menu. Confirm the execution device.
- Choose a task and inspect the environment: GPU, available VRAM, memory, disk space, download size and model status.
- Read the selected model's license and usage notes. Install once compatibility is confirmed, and wait for download and verification to finish.
- Generate a simple sample using default or small settings. Open the actual file from recent results or its output folder.
- Check the content, elapsed time and actual path before choosing production settings. Specify a destination if you want a copy in your project directory.
Inspect what your computer can run
Inspect which built-in local generation models this computer supports. Report its GPU, memory, disk space, expected download size and validation status. Do not install yet. Recommend an option for a first small sample and explain why.
Install the selected option
Install the local model we selected, then report its installation and validation status and how to test it. Wait for me to provide the generation prompt.
A simple image test prompt
A small red toy house on a white desk, soft daylight, clean background, no text.
| Purpose | Choose based on |
|---|---|
| Text to image | Models listed by the environment check, resource requirements and sample results. |
| Image upscaling | Source image type, driver support, available scaling options and output dimensions. |
| Local short video | Currently supported duration, dimensions, hardware requirements and verified runs. |
Local inference runs on the computer. Chat, prompt optimization and cloud generation may still call cloud services and use their own usage rules. Success means the local result file opens correctly, its content can be inspected and you know where it is stored.
Understand subscriptions, credits and orders
Check service benefits, credit balances and device slots separately, using your current account and order details.
Use this site's subscription page or account area to inspect current benefits and orders. Prices, offers, payment methods and plans can change. Before paying, check the final amount, service dates and benefits shown on the page.
| Item | What it means |
|---|---|
| Subscription | Provides plan benefits during its service period. Check credit allowance, device slots, concurrent tasks and dates. |
| Subscription credits | Issued by service month. Unused credits expire under the applicable rules; annual payment does not mean all annual credits arrive at once. |
| Permanent credits | An additional purchased balance that does not reset at the end of a service month. Buying credits does not automatically add device slots. |
| Client device slots | Determines how many computers the account can bind. Editor connections on the same computer share its device slot. |
| Concurrent tasks | Determines how many tasks can run at once, separately from the number of bound computers. |
- Sign in to the account area and check the current plan, service period, credit balances and bound devices.
- Choose a new subscription, renewal, upgrade or permanent-credit purchase. Check the offered benefits, dates and final amount.
- Complete payment, then return to order history and check both payment and benefit fulfillment.
- Refresh the account and workspace, and verify the plan, balance or device slots have updated as stated in the order.
Clients on the same account share its credit balance. Under the service rules, current subscription credits are used before permanent credits. Renewals, upgrades and downgrades have different effective dates; inspect the start and end dates on the actual order.
When something feels unclear
Check the account, work location and connection state before repeating a task.
Are cloud and local files with the same name the same file?
No. Check the source, selected computer and full path. If you need a copy in both locations, explicitly request copying or synchronization and verify both results.
Why did a task run in the cloud after I opened a local folder?
The file-browser source does not determine the execution target. Select the computer in Work location, verify its work mode and directory, then send the local request.
Why is the computer online but no editor project card appears?
Check that the application is open, its connection component is enabled, versions are compatible and permissions allow access. Refresh the list and verify the actual project with a read-only task.
What if the assistant says it finished but I cannot find the file?
Ask for the actual absolute path and a read-back. Check the cloud/local source, target computer and refreshed file list. Submitted or Generating does not yet mean the file has been delivered.
Can a minimal client follow every chapter?
Start with device connection, work location and the file exercise. Check the actual platform and client for editor, local-model and embedded-workspace support rather than assuming the full-client interface applies.
How is the mobile browser different from the Android app?
A phone browser can access the web workspace to arrange cloud tasks or operate an online computer. The Android package is a separate mobile client; check the app for its device capabilities and permissions.
What if local-model controls are unavailable or a run fails after installation?
Verify the device is online, the client supports the feature, a model is selected and the environment check passes. Keep the full error and task ID, inspect the existing task, then follow its guidance. Installation does not replace a real sample run.
Should I resubmit a task that keeps waiting?
First identify whether it is downloading, queued, generating or waiting for your answer. Inspect the existing task ID and progress before deciding to retry. For payment issues, check the original order first.
What information should I provide for support?
Include the entry point, time, system and client versions, device name, reproduction steps, exact error and task or order ID. Hide passwords, access tokens, payment codes and unrelated personal data in screenshots.
Ready for your next task
Use this checklist while you learn. Selections last only while this page stays open.
Completed 0 / 6
Make something of your own.
Open your workspace with a clear target, a chosen work location and one way to verify the result.
Open workspaceContinue with video tutorials →